
Welcome to the wonderful world of crochet! Today, we’re going to learn how to create beautiful, elegant white Christmas ornaments. With this easy-to-understand tutorial, you’ll be ready to start a new crochet project today. Let’s go!
Materials you will need:
White crochet yarn (choose your favorite)
Crochet hook compatible with the chosen yarn
Scissors
Fiber filling (to shape the ornaments)
Decorative ribbon (optional)
Step 1: Start with a slip knot
To begin, make a slip knot at the end of the thread. This will create a handle that you will use to start your work.
Step 2: Making a magic circle
For our Christmas ornament, we’ll start with a magic circle. Hold the loose thread in your left hand and insert the needle into the center of the circle. Pull the yarn through the center to form the first stitch.
Step 3: First row of single crochets
Now, make 6 double crochets inside the magic circle. This will form the base of our ornament. Be sure to work over the loose thread so you can pull it to close the circle later.
Step 4: Closing the circle
Gently pull the loose thread to close the magic circle. This should result in a small circle with 6 single crochets inside. Join the last and first single crochet with a slipped stitch to close the row.
Step 5: Increasing the number of stitches
Now, to increase the size of the ornament, work 2 single crochets in each single crochet of the previous row. This will double the number of stitches, giving you 12 stitches in total.
Step 6: Continue to increase
Repeat the previous step, making 2 single crochets in each stitch of the previous row. This will double the number of stitches again, leaving you with 24 stitches at the end of this row.
Step 7: Forming the body of the ornament
Now continue to single crochet in each stitch from the previous row until the body of the ornament reaches the desired size. This can vary depending on how big you want your ornament to be. Generally, 3-4 rows are enough for a small to medium ornament.
Step 8: Finishing the ornament
Once the body of the ornament is the desired size, cut the wire, leaving a tail of about 10 cm. Thread the tail through the needle and thread it through the end stitches to close the top of the ornament.
Step 9: Filling and finishing
Stuff the ornament with fiberfill to give it a pretty shape. Then sew the top closed to keep the stuffing in place.
Step 10: Adding a touch of elegance (optional)
If you want to add a special touch, tie a decorative ribbon to the top of the ornament to create a handle for hanging it on the Christmas tree.
And voila! You’ve just created an elegant crochet Christmas ornament in white. Now, you can make more of these ornaments to decorate your tree or give as gifts to friends and family. Remember that practice makes everything easier, so don’t worry if it doesn’t come out perfect the first time. Keep practicing and have fun with your new crochet hobby!
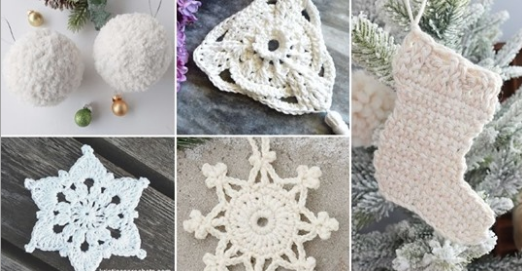
Free Patterns Available: Crochet Furry Snowball Baubles Christmas Stocking Ornament Snow Crystal Lovely Lilac Bunting Festive Snowflake
If you liked this pattern, but still want to see some other models before starting a new project, below we will leave some more patterns of crafts with crochet threads:
Train Amigurumi – Free Pattern
Amigurumi Christmas Wreath Free Pattern
Vintage Granny Square Christmas Tree
It is with great affection, love, grace and mercy that we wish all our readers a life full of God’s blessings in their homes, and mainly showered with good cheer and creativity to make the most beautiful crochet patterns.
Crochet And Me!