
The sunburst granny square blanket is a beautiful and unique project that is perfect for any level of crocheter. This tutorial will walk you through each step of the process, from start to finish, so that you can make your own blanket in any size or color combination you like.
So grab your hooks and yarn and get ready to learn how to make this stunning blanket!
Sunburst Granny Square Blanket: What You’ll Need
In order to complete this project, you will need the following materials:
– Crochet hook in size J/10-6.00mm
– Yarn needle
– Scissors
– 4 skeins of worsted weight yarn in coordinating colors (I used Red Heart Super Saver in Aran and White)
To start, you will need to create a slipknot on your crochet hook. Once you have done that, you will need to chain 4 stitches. Next, you will single crochet in the first stitch from the hook, and then double crochet in each of the next 2 stitches.
You should now have 3 double crochets and 1 single crochet. To finish off the row, slip stitch into the first stitch (the single crochet). Row 1 should look like this when you are finished.
Single Crochet into the first stitch (the single crochet), and then double crochet in each of the next 2 stitches. You should now have 3 double crochets and 1 single crochet. To finish off the row, slip stitch into the first stitch (the single crochet).
Crochet Terms and Techniques You Should Know
There are a few crochet terms and techniques you should know before you start this blanket tutorial. First, the term “granny square” refers to a specific type of crochet stitch. To make a granny square, you’ll need to know how to do a basic chain stitch and a double crochet stitch.
The second term you should know is “sunburst.” A sunburst granny square is simply a granny square that has been embellished with additional stitches to create a radiating effect. In this blanket tutorial, we’ll show you how to do a basic sunburst granny square.
Finally, you should know about the concept of gauge in crochet. Gauge is the number of stitches per inch that you can achieve with your chosen yarn and crochet hook. It’s important to check your gauge before starting any project, so that your finished product will be the correct size.
How to Join the Squares Together
To join the squares together, you will need to first crochet a round of single crochet stitches around the edge of each square. To do this, insert your hook into the corner stitch of one square, yarn over and pull up a loop, then yarn over and draw through both loops on your hook (this is one single crochet stitch).
Continue working single crochet stitches into each stitch around the edge of the square until you reach the beginning again. Work 3 single crochet stitches into the corner stitch to help keep the blanket nice and flat. Repeat this process for each square.
Once you have crocheted a round of single crochet stitches around all of your squares, it’s time to start joining them together. To do this, hold two squares together with the right sides facing each other and insert your hook into the corner stitch of both squares.
Yarn over and pull up a loop, then yarn over and draw through both loops on your hook (this is one slip stitch). Continue slip stitching around the edge of both squares until you reach the beginning again. Fasten off and repeat this process for each pair of squares until all of them are joined together.
Fastening Off and Weaving in the Ends
One of the most important steps in any crochet project is fastening off and weaving in the ends. This ensures that your work will be secure and will not unravel.
There are a few different ways to fasten off your work. The most common way is to cut the yarn, leaving a tail, and then thread the tail through the last loop on your hook. Pull the tail tight to secure the loop, and then snip off the excess yarn.
Another way to fasten off is to work a slip stitch into the last loop on your hook. This creates a nice, neat edge and is especially good for projects that will be worn or used a lot, as it helps prevent them from coming undone.
Once you’ve fastened off your work, it’s important to weave in the ends. This helps prevent your work from unraveling and also makes it look neater.
There are a few different ways to weave in ends, but one of the easiest is to thread the end of the yarn through a tapestry needle and then sew it back and forth through some of the stitches close to where you finished crocheting. Trim off any excess yarn and you’re all done!
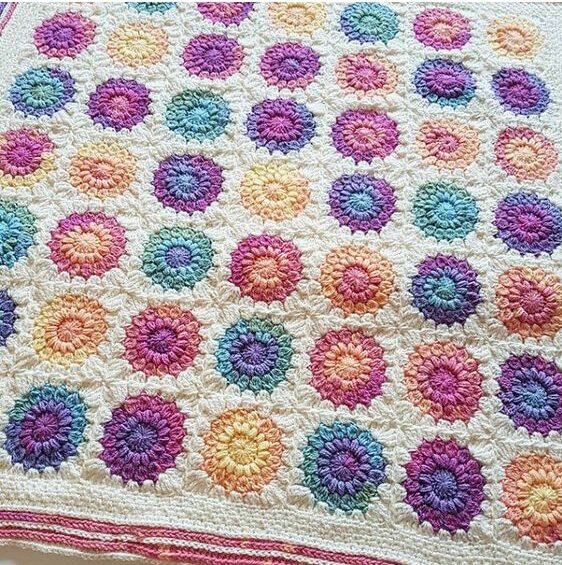
Sunburst Granny Square Blanket
We hope you enjoyed this tutorial on how to make a sunburst granny square blanket. This is a great project for beginners, as it only uses basic crochet stitches.
And once you get the hang of it, you can easily customize the blanket to any size or color scheme you like. So go ahead and give it a try – we know you’ll love the results!
If you liked this article, share and like on Facebook.
Please tag your photos on facebook and post your final result in my group.
JOIN THE FACEBOOK GROUP CLICK HERE
Learn how to make Sunburst Granny Square Blanket Tutorial:
Access the free pattern / Sunburst Granny Square Blanket Tutorial
If you liked this pattern but want to see more options for patterns to make with crochet yarn, below we leave some more models for you to be inspired by:
Sunburst Granny Square Blanket
Pastel Rainbow Baby Crochet Dress Free Patterns
Baby Princess Dress Free Crochet Patterns
Red and White Crochet Baby Dress is a Timeless Classic
Crochet Baby Girls Rainbow Dress
Crochet Wedding Dress – 50 Options For You to Fall in Love With!
Flower Pearl Crochet Booties [Free Pattern]
Quick Baby Booties with Bow – Free Crochet Pattern
All of us had a great week, full of God’s Desired houses in their works, and a lot of creativity to start another project mainly with crochet yarn.
With love and affection, Crochet And Me!